tl;dr: Raspberry Pi + Arduino Pro Mini + Nuage = Yún compatible device
Take an Raspberry Pi, install „Nuage“ and connect an Arduino Uno or Pro Mini or some special shield. The result is a Yún compatible „IoT“ device. If you have an old single core RPi, some stripboard and a bare ATmega328P this can be done at nearly no cost!
Updated for Raspberry Pi 3 and systemd
As of August 5th, 2016 I updated the package to work with Raspberry Pi 3 and systemd. Please test. Bugs might be reported to ms@mattiasschlenker.de or to the GitHub issue tracker.
Nuage (french for „cloud“) is a port of Arduino Yúns Bridge library to Raspberry Pi and other single board computers with Debian based operating systems. If you are new to the Yún: This is a single board computer containing the AR9331 MIPS microprocessor (as found in many cheap DSL routers and access points) with the ATmega32u4 microcontroller (as found in the Arduino Leonardo). The communication between the two sides is done over a serial connection. Abstraction is provided by a library called „Bridge„.
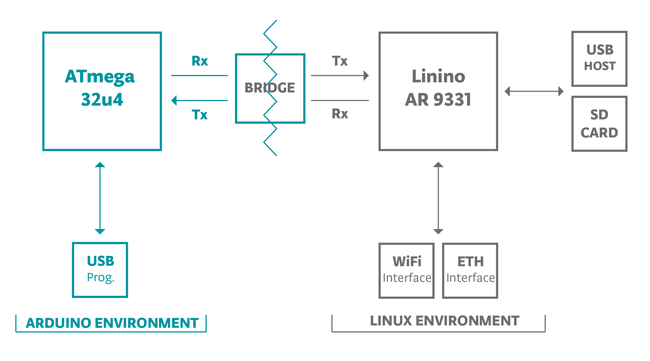
The bridge as implemented in the original Yún (©arduino.cc)

The setup on the breadboard behaves like a Yún – using the Watterott RPi shield bridge is cleaner however!
Although from a technical perspective the bridge is not the most performant or memory saving solution, it is easy to use and allows the user in many cases to read sensors or run actuators with simple Arduino sketches and no programming on the Linux side – even providing a REST API. This makes it ideal to extend projects for the „Internet of Things“ (IoT) starting only with Arduino knowledge.
No 100% compatibility
Do not expect to achieve 100% compatibility. There are some trade-offs and design decisions. For example the original Yún allows you to run arbitary code with root privileges. Raspbian/Debian is a true multiuser system. So on Nuage the bridge user is only allowed to run as „normal“ user. Write wrappers and use „sudo“ to execute them with root privileges!
Problems with Yún
With around 65€ to 75€ including taxes the original Yún is not the cheapest single board computer available. It is also somewhat limited by the slow MIPS processor (single core 400MHz vs. quad core 900MHz on the RPi) and the low RAM (64MB vs. 1024MB on the RPi). Because of the trademark disputes between Arduino LLC and Arduino SRL the future of the Doghunter supplied Yúns might be unclear. And there are ongoing differences on whether to supply the boards with Linino (Doghunter) or OpenWRT-Yún (arduino.cc).
Solution: make it modular
My solution was to split up the original Yún into three parts: software, microcontroller and microprocessor. The software has been pulled out from the original Yún, some wrapper scripts were added and the REST API was ported to the Flask application server because of the easier deployment, software target currently is the Debian Wheezy based Raspbian, Ubuntu will follow. Primary hardware target is Raspberry Pi, support for Banana Pi and Orange Pi running Bananian is in beta state. Contact me if you want to test on other boards. The current microcontroller target is Atmel ATmega328P, boards based on ATmega1284 (most versatile AVR available as DIL package) and ATmega2560 will follow. I do not plan to support ATmega32u4, but if you need the support for industrial or educational projects, feel free to contact me – support can be retrofitted within less than 10 hours of work. Same goes for support of ATtiny84.
In general my target is to allow an arbitary combination of single board computer (currently ARM based, other platforms later), a matching linux distribution, a readily available Arduino board or even an AVR setup on a breadboard to put together „your Yún“.
Recommended skills
As of the current state of the software you should have some experience with Raspberry Pi and Raspbian as well as having tinkered at least a bit with Arduino input and output. Preferably you have played around with serial communication. It is beneficial if you have some understanding of the SysV init of Wheezy and tools to debug serial connections in Linux. Of course some experience with the original Yún is also nice.
Prepare a sketch
If you have the possibility to prepare the ATmega part of the equation with a sketch (some of the HATs and boards mentioned below need a FTDI breakout to upload sketches or you have to pull out the ATmega328P and flash it with an Arduino Uno), please upload this sketch: Immediately after reset it flashes fast twenty times on pin 13 and then returns to a slow flashing during the loop. This way the reset can be tested.
Connect the hardware
Contrary to the original Yún we use serial communication to upload sketches. Using SPI flashing on the original Yún has several reasons, partly in the used microcontroller and partly in the used oerating system (OpenWRT) with a quite simple init system. With other init systems and the non USB ATmegas, using the serial port makes more sense. Please note: You cannot debug over serial anymore, either use the Console or SoftwareSerial!
Connect the hardware first!
Future versions of Nuage will read the reset pin from the EEPROM that Raspberry HATs that follow the specification bear! So connect the Arduino or the shield when the RPi is turned off and install afterwards.
Arduino Pro Mini (8MHz 3,3V)
The Arduino Pro Mini, Wattuino Pro Mini with an 8MHz oscillator can be run on 3.3V thus not requiring a level shifter. If you have some chinese clones with 16Mhz lying around, you might flash the bootloader to use the internal oscillator at 8MHz (not very precise), than they can be run with 3.3V. Download the FZZ to view in Fritzing.
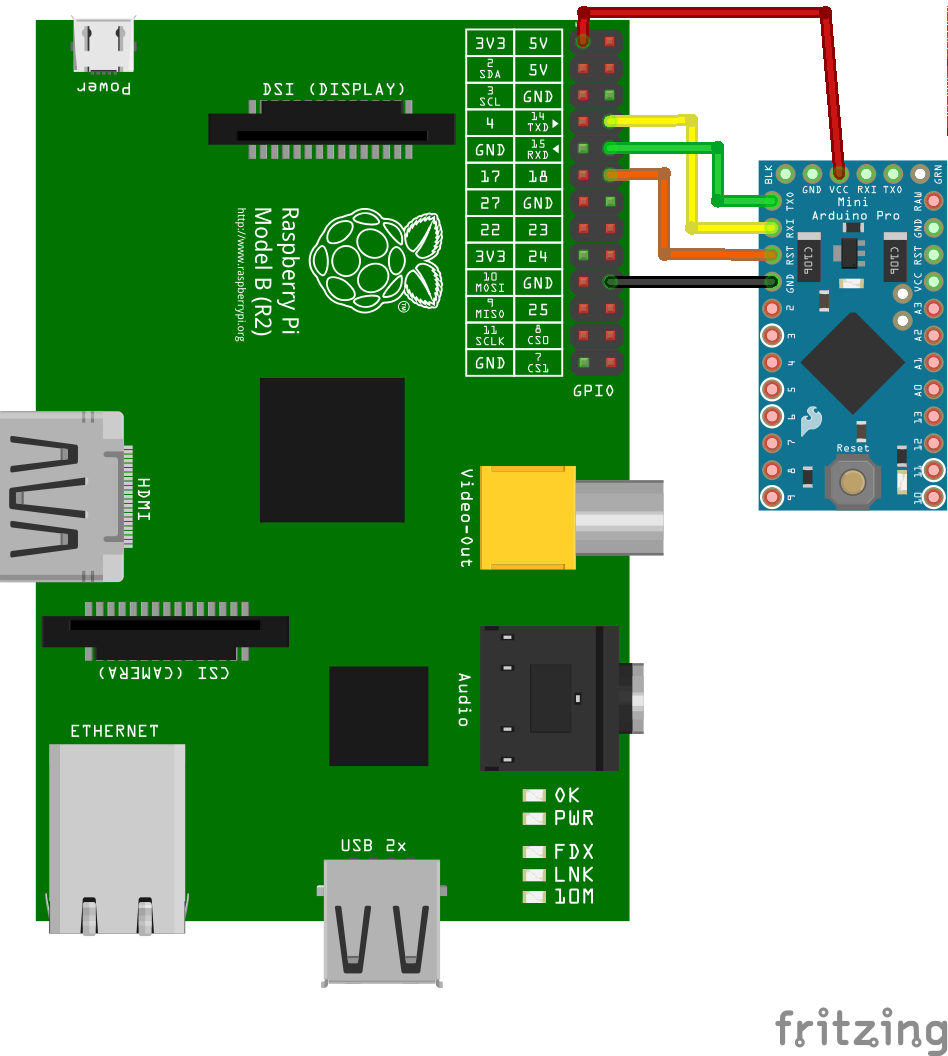
3.3V Pro Minis can be connected without having to use level shifters – of course you can use the headers on the FTDI side.
Arduino Uno
The Arduino Uno R3 might be the most widely used Arduino out there and you can use it for Nuage. Since the UNO runs 5 Volt while the Raspberry Pi runs 3.3V you have to use either voltage level converters or use a voltage divider for the RX side of the RPi. Our example shows the setup using a voltage divider consisting of a 1.8kOhm resistor and a 3.3kOhm resistor. Since the RPi provides regulated 5V we can directly connect to the 5V pin of the Arduino to power the UNO. Download the FZZ to view in Fritzing.
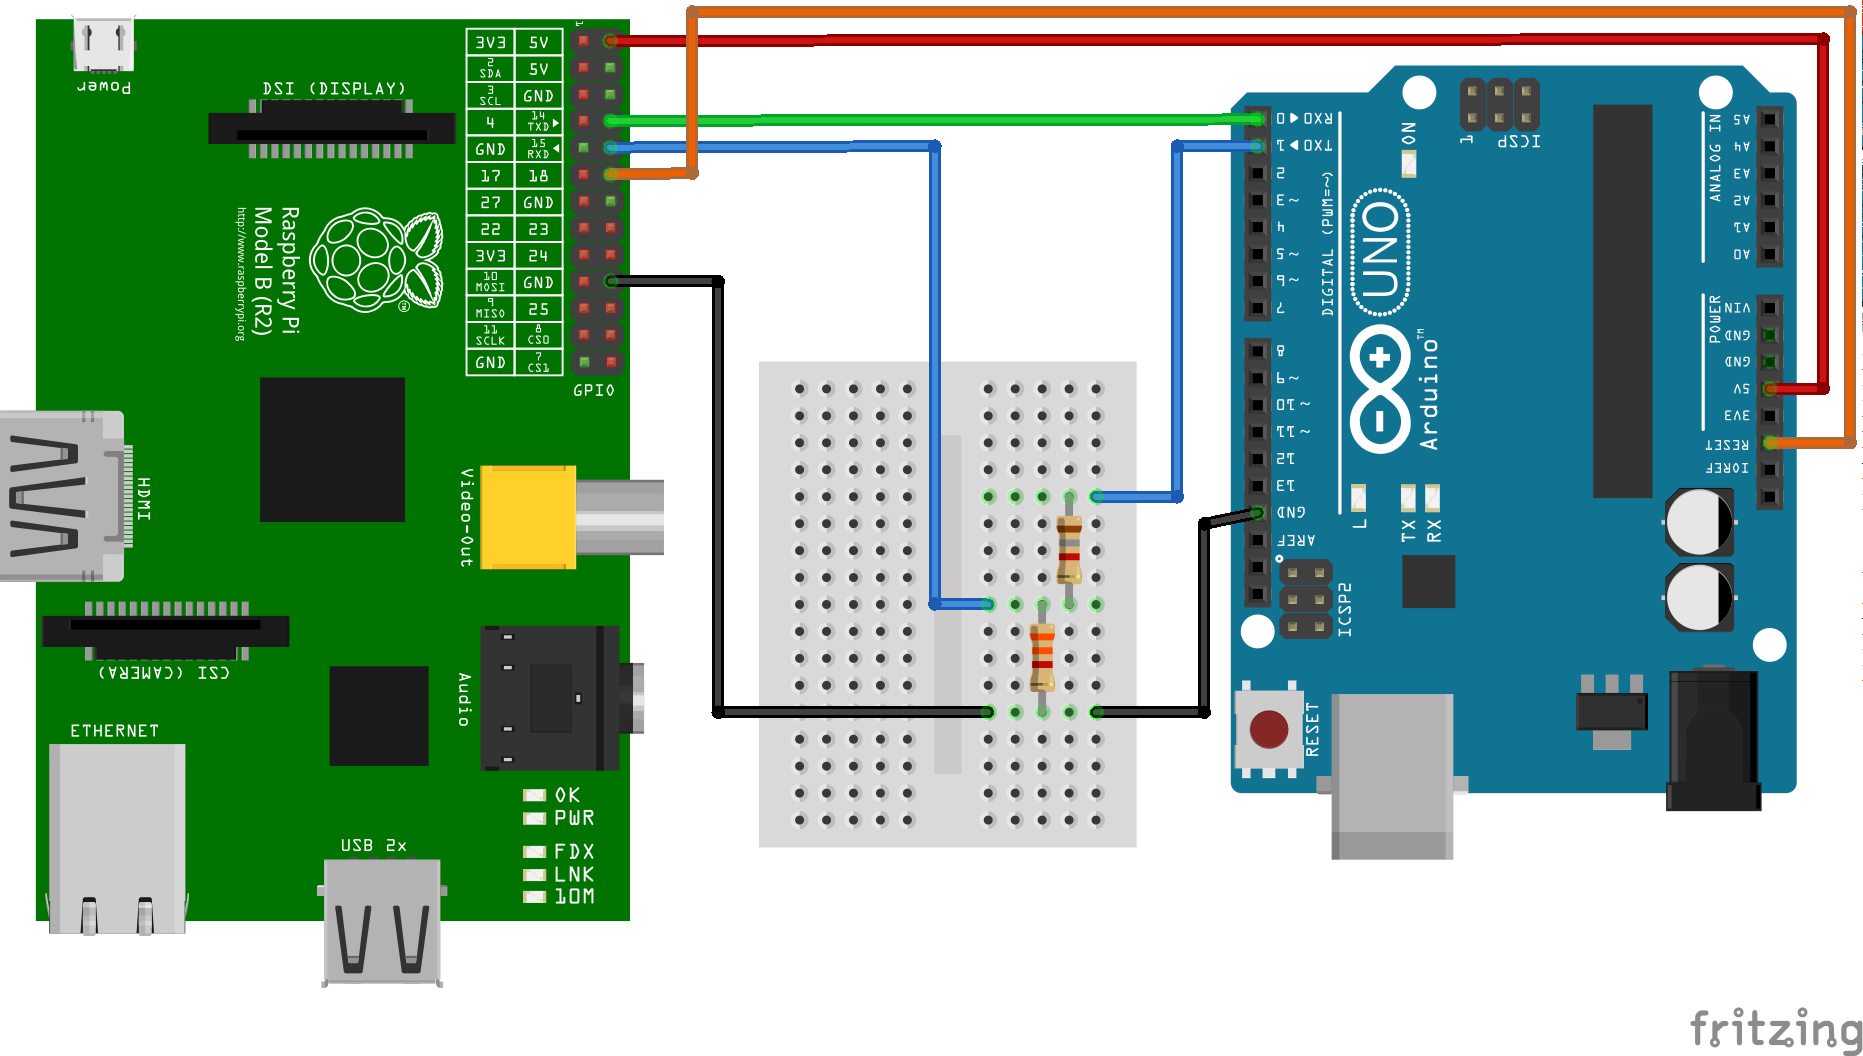
Since the RPi uses 3.3V and the UNO 5V you have to connect via voltage level converter or voltage divider.
Watterott RPi Shield bridge and RPi UNO HAT
The easiest and most robust – and thus the recommended – solution is using Watterotts RPi Shield bridge (for RPi A and B) or RPi UNO HAT (for RPi A+, B+ and 2B). It is cheaper than an UNO R3, has headers for Arduino shields and directly fits to the 26 pin GPIO header of the Raspberry Pi. A version for Raspberry Pi A+, B+ and Raspberry Pi 2 is available as RPi UNO HAT. It contains logic level converters and is prepared for all needed connections. However, the serial connection is not closed! So when soldering the headers, also close the jumpers marked with „JTX“ and „JRX“. If you want to be able to upload sketches when not sitting atop the RPi, also solder the FTDI headers and close „JVCC“.
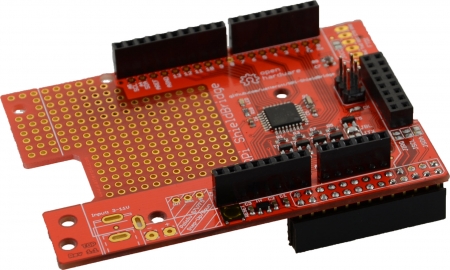
Image ©watterott.com
Arduino on breadboard
A cool alternative for saturday afternoons is laying out the complete setup on a breadboard or stripboard. In fact, my prototype was such a stripboard setup. All you need is an ATmega328P with fused to 8MHz (internal oscillator) that can be run on 3.3V. I have prepared some hardware definitions for Arduino 1.6.x. Please refer to Arduinos documentation on how to flash the bootloader. Once the ATmega328p has a bootloader, connect this setup. Download the FZZ to view in Fritzing.
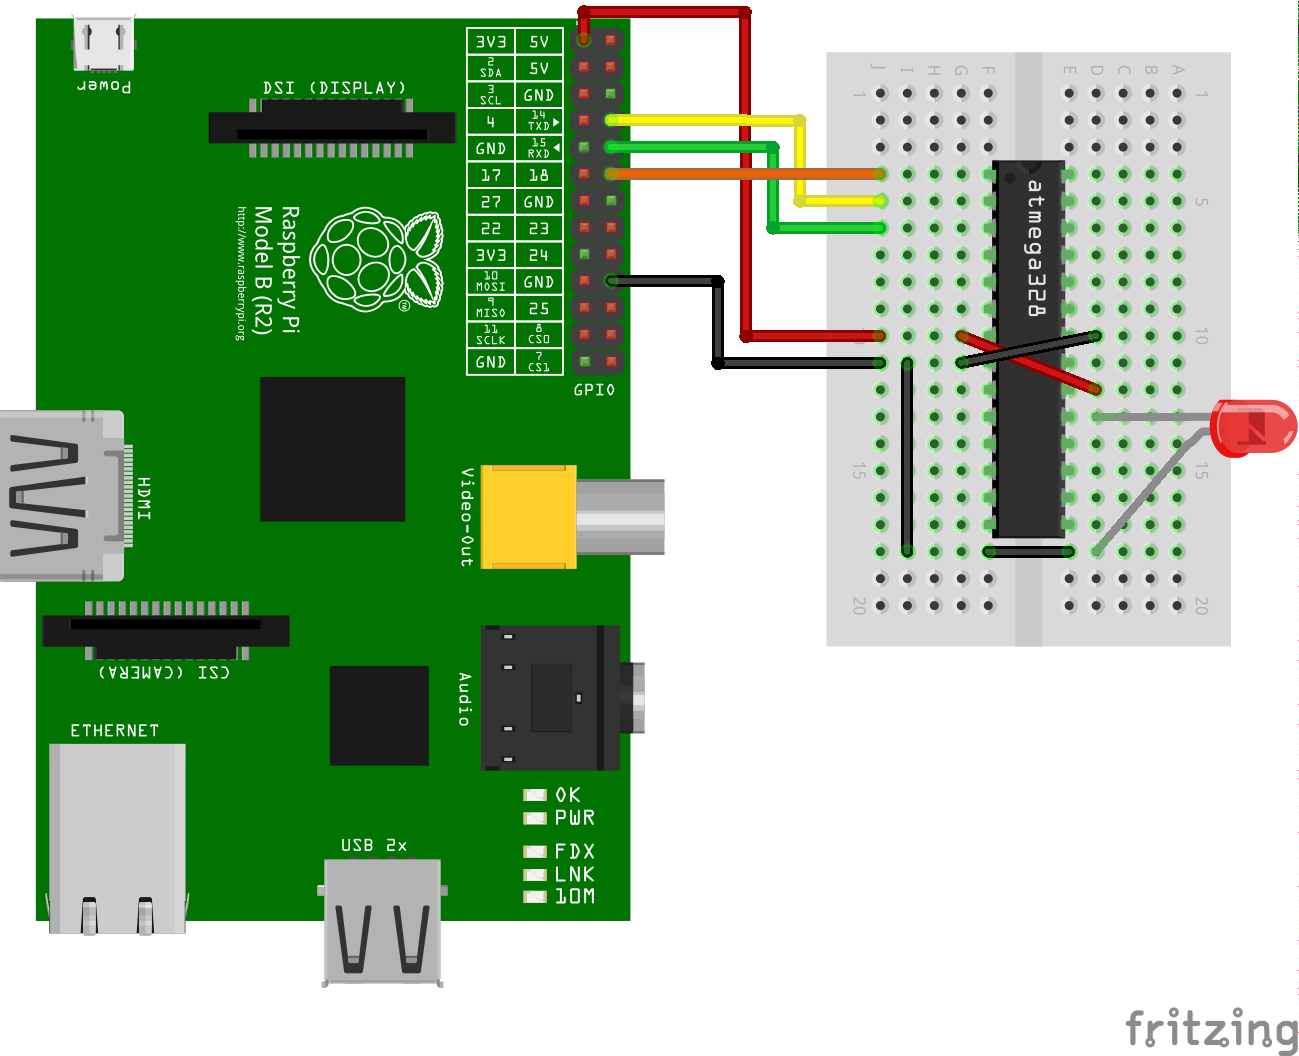
The easiest setup: Use an ATmega328p that is flashed with an Arduino bootloader and fused to run on the internal resonator.
Software installation
Notes for Banana Pi
Install WiringBP and RPi.GPIO_BP (those require git build-essential python-dev) before installing anything else!
On the Raspberry Pi
Notes for Raspbian/Jessie
Make sure to enable serial in the configuration tool before installing nuage, otherwise you have to manually add entries to /boot/cmdline.txt.
Install the required packages:
sudo apt-get update
sudo apt-get -y dist-upgrade
sudo apt-get install avrdude lua5.1 telnet avahi-utils
sudo apt-get install strace lsof curl wget python-flask
Now download and install nuage:
wget http://cdprojekte.mattiasschlenker.de/nuage/nuage-bridge-latest.deb
sudo dpkg -i nuage-bridge-latest.deb
sudo apt-get -f install
Set a root password, sketches have to be uploaded with root privileges:
sudo passwd
Finally make sure, „root“ can login via SSH:
sudo sed -i 's/PermitRootLogin without-password/PermitRootLogin yes/g' /etc/ssh/sshd_config
After installing the software, reboot and then test the reset:
sudo nuage-reset
If the LED on pin 13 does not flash quickly, find the correct reset pin and change it in the file /etc/nuage/nuage.cfg accordingly (notation is in header notation, not GPIO notation, pin 12 equals GPIO18!). See the table below for reference. When using an UNO you also have to change the bootloader baud rate to 115200, most of the other boards use 57600:
[AVRdude]
bootbaudrate=115200
On the machine running the Arduino IDE
First make sure you are running Arduino IDE 1.6.4 or later from arduino.cc. Start it once to generate the necessary directories and update you configuration.
Then download the Nuage hardware definitions and unpack them to the folder Arduino in your home directory – this folder usually already contains some libraries and sketches.
Alternative Bridge library
If you are intending to use Nuage in non standard setups, you might alternatively try out Paul Stoffregens version of the bridge library: github.com/PaulStoffregen/Bridge.
Start testing
Within a minute or so after starting the Arduino IDE the RPi should become visible:

Raspberry Pi disguised as Yún
Next, select the board connected to the RPi from the boards menu, section „Nuage“:
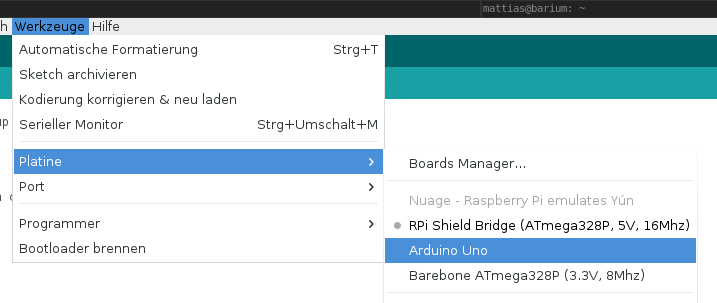
Select the board connected to the Raspberry Pi
You should also activate verbose messages during upload. Make sure a root password is set on the RPi, the use some sample sketch like „Basics > Blink“ to test uploading. When uploading works, try some of the few sample sketches I have prepared. For example „BridgeBlink“ makes the LED on pin 13 blink only when writing to the bridge was successful. Use the serial monitor to receive one „Hello World!“ every second. The example „KeyValue“ writes to the key-value-storage. Access the web interface at http://12.34.56.78/keystore_manager_example to access the storage.
Mind the difference!
Note the #define BRIDGE_BAUDRATE 19200. This overrides the standard baud rate of 250000 that is used on the original Yún. With Nuage 19200 are reliable (bare ATmega328P, 8MHz internal clock) up to 115200 (Pro Mini 16MHz or Watterott Shield Bridge). You might set those higher baud rates by adjusting /etc/inittab accordingly.
Bugs, FAQ, Troubleshooting
If you want to develop on Nuage, please visit the GitHub repo. For issues please use the bugtracker at GitHub.
You want to support the development? Buy developer minutes, contact me by Email ms@mattiasschlenker.de.
Readily available shields/HATs
I am trying to put together a list of shields that can be used together with Nuage. Please note that the UART and Reset have to be connected or at least have to be prepared for easy connection. I will not list shields that require extensive modifications. Feel free to contact me to point me to other shields to add to the list.
| Name | Price, availability | RPi B | RPi A+/B+/2 | MCU | Reset pin (phys.) | Tested? Notes? |
| RPi Shield Bridge | 19€, Europe, http://www.watterott.com/ | x | ATmega328P, SMD, 16MHz | 12 | Yes, development of Nuage took place with this board | |
| RPi UNO HAT | 16€, Europe, http://www.watterott.com/ | x | ATmega328P, SMD, 16MHz | 7 | Yes | |
| PiDuino | 18£, Europe, http://skpang.co.uk | x | ATmega328P, DIL28, 8MHz | 24 | Untested.1 | |
| Gertduino | 28€, everywhere, http://www.element14.com/ | x | ATmega328P, DIL28, 16MHz | ? | RTFM for setting jumpers! Untested.1 | |
| Arduberry | 30$, USA, http://www.dexterindustries.com | x | ATmega328P, DIL28, 16MHz | ? | Untested. |
1These boards do not ship with an Arduino compatible bootloader, so you have to use a Pro Mini or Uno to burn the bootloader.